- SPORT-WASH LAUNDRY DETERGENT
- Care of Performance Fabrics
- Tips for using Sport-Wash Laundry Detergent
- Tips for using Sensi-Clean
- SB258
- Soft-Shell Systems
- Washing ACU, Army Combat Uniform
- Proper Care for Performance Fabrics
- Washing Cloth Diapers
- Soap Versus Detergent
- Caring for Waterproof Fabrics
- Sport-Wash Detergent Evaluation
- Sensi-Clean Detergent Evaluation
- Flammability - Children's Sleepwear
- Rinsability of Sensi-Clean
- Water Repellent Durability
- High Efficiency (HE) Washing Machines
- Don't Wash Away Performance
- The Detergent Conspiracy
DIY Fabric Water Repellent Test
Fabric Water Repellent, Do It Yourself Test
There are vast differences in the performance of different waterproofing products. Every product claims to be the best, but the most expensive products are often the least effective.
Now you can measure water repellency like the professional labs with little more than a soda bottle and a paper clip. Ingenuity can compensate for a lack of laboratory equipment. You can get very consistent results and easily determine which products are best.
All we need is to mimic the standard test methods by sprinkling a measured amount of water with the same force and pattern on every specimen. Then we observe the sticking and wetting and compare it to standard photographs to assign a rating from 0 to 100.
Gather these materials and begin or just read along to gain the perspective necessary to know how well your repellent works.
1. 2-liter soda bottle with cap.
2. A paper clip or .040" Drill.
3. Board with hole or pair of sticks and tape to support spray funnel.
4. Embroidery hoop to hold fabric.
5. Fabrics and waterproofing products to test. Uniform medium colors like blue denim are easier to
score than black or white.
6. Clean tub to hold a couple gallons of water for testing.
7. 8 ounce cup to measure out consistent quantity of water for each test.
8. A good sharp copy of the scoring photos. We took these ourselves so as not to infringe on the
copyrights of the various standards organizations that support these test methods.
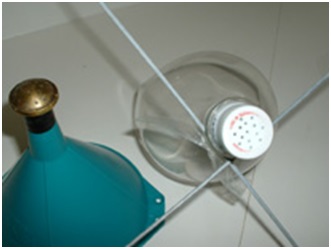
This photo illustrates a "proper" test
configuration.

While it’s nice to have stainless steel lab
equipment, this really isn't necessary.
You are looking for consistency.
The only variable you want to change is the
repellent.
This is a more do-it-yourself arrangement.
Notice that we still have about 6" from
spray head to center of fabric and that the
fabric is tilted at about 45o, the hoops are
available at sewing departments or use a
small pail with a large hose clamp.

Those Sno-Seal® jars under the wires are
raising the spray head to the 6" height.
The most critical part of the set-up is the spray
holes. Plastic 2-liter soda bottle caps are easy
to perforate with a drill or a heated paper clip tip.

The certified spray nozzles use 19 holes in a
thin metal dome. They produce 19 fairly equal
and uniform streams of water for a duration of
30 seconds as 8 ounces of water drains from a
funnel. If the holes are a bit large the 8-fl. oz. of
water may be exhausted in 30 seconds with only
14 or 15 holes. Smaller holes will enable you to
get closer to the "Official" number of 19.
Early 2-liter bottle caps were very thin metal with
a elastamer liner. They should be avoided because
they require careful angle drilling of very small holes
and removal of the elastamer. The next generation
caps were plastic with an elastamer lining. These
are easy to puncture at appropriate angles with a
hot paper clip tip. (Hold the wire with pliers because
you have to get the tip quite hot and the wire does
conduct heat. If you can remove the lining material
the cap will be thinner so the holes can be smaller.

If the lining is left in place you may have to use a large (2") paper clip to get big enough holes.
The latest 2-liter caps are liner-less plastic. These are worth buying the beverage. The outer circle of holes should angle outward at about 15o and the center hole straight down. Intermediate holes can be pierced at proportional angles. This is not highly critical and they can be "corrected" a bit if observed to be causing overlapping streams. Sandpaper can smooth away burrs that misdirect streams.
Tune the size and direction of the holes till it takes 30 seconds to drain 8 ounces of water with a minimum of overlapping streams. You may have to consume several beverages to get it just right or you can buy a certified spray head from AATCC.org.
Pre-washing, treatment, drying, heating, and subsequent washing etc. should all be done according to the instructions provided by the manufacturer of the repellent. (Limited by the fabric care instructions). Repellents usually work best on materials that already were treated with similar products. Use Silicone for silicone impregnated and fluoropolymer for most DWR materials. Most fluoropolymers require heat to reach maximum effectiveness and durability. Untreated cloth can be treated with either. Mixing products is seldom effective. Silicone prevents fluoropolymer from bonding to the fabric; and fluoropolymer repels silicone.
Test fabrics should be pulled tightly enough to bounce a coin.
Water should be in a tub to ensure uniform temperature from beginning to end (test specifies 80o ± 2o). The tub must be clean and well rinsed. Any trace of detergent will make the water penetrate much faster giving incorrect test results.
Before testing your specimen run a few trials with non-critical cloth. Make certain the hoop is at 45o, the center is 6" below the spray head, the streams all fall within the circle, and the 8-fl. oz. of water runs out in about 30 seconds.
Now try it with your specimen.
1. Pour 8-fl. oz. of water taken from the tub. And wait for it to drain thru the spray head.
2. After each water spray the hoop should be tapped lightly against an object, twice to one edge and
then twice to the opposite edge to dislodge loose water before scoring.
3. Now assign a score by comparison to the standard photographs.
ASTM SCORING CHART
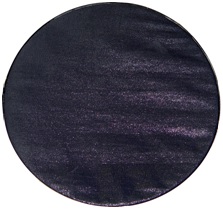 Total wetting of upper and lower surface = Score 0
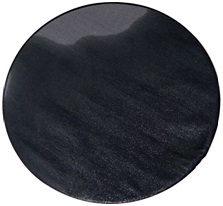 Complete wetting of whole upper surface = Score 50
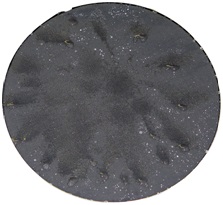 Partial wetting of whole upper surface = Score 70
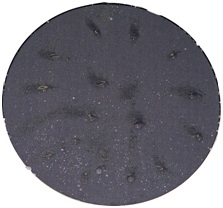 Wetting of upper surface at spray points = Score 80
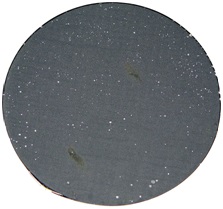 Slight random sticking or wetting of upper surface = Score 90
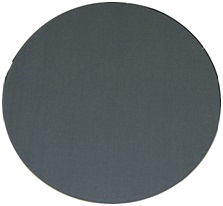 No sticking or wetting of upper surface = Score 100
For a limited time we will provide complimentary scoring if you mail, email, or post and link pictures taken within 30 seconds of the water spray test. For the best, most objective opinions please do not tell us what product we are scoring. A picture taken in same light and position before and after testing may also help.
If you are comparing Atsko products to Nikwax® products, you won't need any help to see which are best.
Now imagine running this test 50 consecutive times. This simulates about 50 minutes of passing showers. We ran a 50 consecutive test durability comparison. Now that you understand the test process this link is a lot more interesting. Also see Loss of Repellency by Washing to see how Sport-Wash® can maintain high tech functions wash after wash.
Thanks for taking the time to learn more about water repellents. Please share this information with others.
This article may be reproduced without permission as long as credit is given to Atsko, Inc.
